Monday, December 9, 2013

Tip Tuesday- Hanging Ornaments with Paper Clips

My boys both have trees in their bedrooms and I decided to get one for little girl this year.  I know I am starting her early!  I went with the cutest little pink tree and got a small box of ornaments.  I went to hang the ornaments and realized the hooks were in the ornament box up in the attic.  So I had two choices....wait for my hubby to come home and get them or improvise.  Of course I improvised!

Supplies Needed:  Mini Paper Clips


I have an over abundance of paper clips for some reason -they must have been on special at back-to-school time.  I took a bunch of pretty colored ones and all I did was unwind them into an S shape.


Then you hook them onto the ornaments.


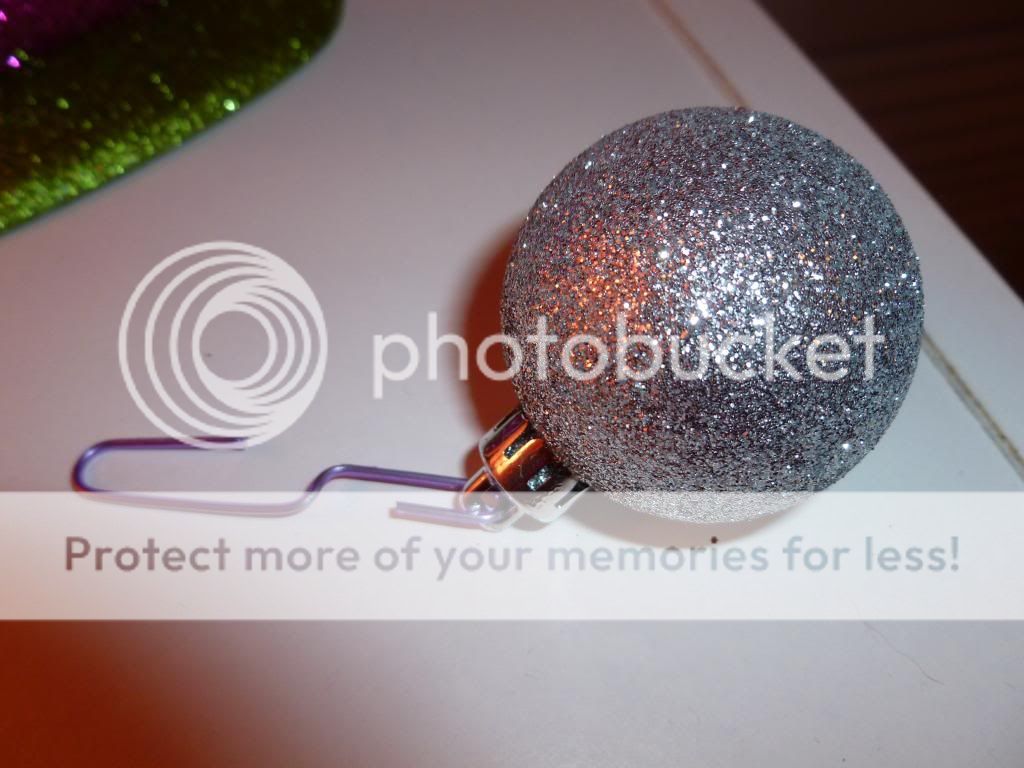
After hooking the ornaments with the paper clips, hang them on your tree!  Super easy and inexpensive! 


Slow Cooker Pot Roast

I love to read and mostly read mysteries.  I was reading a series about a restaurant owner who solves crimes in her hometown and in between chapters were recipes.  This slow cooker pot roast recipe caught my eye and we had to try it instead of our normal onion soup recipe.  It came out so good it is a definite keeper!  I wasn't planning on posting it so there aren't my usual step by step photos.....but hopefully the end result will make you try it! 

Ingredients needed:
1 boneless beef chuck roast about 2.5 to 3 lbs.
2 tsp. Montreal Steak Seasoning
3 tbsp. flour
1/4 cup canola oil
1 can low sodium fat free beef broth about 14.5 ounces
1 can low sodium condensed cream of mushroom soup
2 tbsp. butter
1 onion, coarsely chopped
10 ounces baby bella mushrooms
New potatoes, we used half bag golden yellow
1 16 ounce bag baby carrots

Mix the flour and steak seasoning together. Rub the roast on all sides with flour mixture. Over medium high heat the canola oil in a skillet.  When heated, sear the roast on both sides until browned.  Place the roast in the slow cooker.  (I use slow cooker bags to line the cooker and make clean up much easier!)
Add the beef broth to the hot skillet and deglaze. Then pour the broth into the slow cooker.  And don't add any extra water!
Next, in the skillet melt the butter and sauté half the onion until it browns slightly.  Pour the cream of mushroom soup over the roast in the slow cooker.  Then spoon the sauté onion on top of the soup.  Then add the rest of the onion and half the sliced mushrooms.  Cook on high for three hours.  After three hours, add the baby carrots, the potatoes, and the remaining mushrooms. Cook for another three hours on high.  After that remove and enjoy!  This recipe makes enough juice and it is thick enough it is perfect for a gravy!  YUM!


Tuesday, November 12, 2013

Tip Tuesday - Pinecones

While cleaning out my craft supplies, I found MORE pinecones.  Who knows why I had so many, but I couldn't throw them out!  Here is what I came up with to use up a bunch.......


All you need is a glass vase or container and fill it with pinecones.  I had a bunch of different sized ones.  Then I took a scrap piece of ribbon and tied it around the vase in a bow.  I love how it looks and it filled an empty space on a coffee table!  Now hopefully I won't find any more pinecones while cleaning!

Tuesday, November 5, 2013

Tip Tuesday - Vinyl Holiday Touches

The holidays are quickly approaching!  As you know, I love this time of year and decorate like crazy!  Here are a few easy and inexpensive ways you can use vinyl to add touches of holiday to every part of your house! 

For Halloween I made a vinyl spider web with my Silhouette and placed it on the back of the toilet in the boys bathroom.


Now for Thanksgiving I changed it to a turkey......


My little guy loved it and couldn't stop smiling! 

Then on my front door I used a copper vinyl and added the words "Give Thanks" to the door.   I am in love with how it looks!


You can use vinyl in so many ways to add special touches to your home for the holidays!


Monday, November 4, 2013

Easy Coffee Cake

I am a big fan of breakfast, love it more than lunch.  My boys are not big breakfast eaters but they do love coffee cake!  I found this recipe for coffee cake on Lil Luna. It is so easy and soooo yummy!  My hubby and boys even had some for dessert!


Here is a link to the recipe!  Quick Coffee Cake


The only things I changed were to increase the cinnamon to 3 teaspoons and the brown sugar to 2 cups.  (We like things sweet!)


YUMMY !!!!!!!!


Wednesday, October 30, 2013

Halloween Bowling

Halloween is only a day away and my little guy has been so excited for it!  He was bouncing off the walls today so we did some Halloween Bowling! 


Supplies Needed:
White Cups
Sharpie or Crayon
Balls or Beanbags

This was so easy and fast!  I took 10 white paper cups I had leftover from a party and drew eyes and mouths on them with a black sharpie.  Then we lined them up and rolled some plastic wiffle balls at them. 


Then my little guy had me stack them into different "castles" for him to knock over.


My little guy played this game with me and by himself for over an hour and then we played again when his Daddy got home.  This game is a keeper!   


Halloween Decor

Happy Halloween! 

Since having my little girl I have been very behind on craft tutorials!  I didn't get around to any for Halloween but wanted to share my decorations with you!  Enjoy! 

This is my front entryway. 


These are some letters I have on the table to the right in my entryway.  They were super easy to make.  I bought the paper mache letters from the local craft store and painted them black.  Then I spray adhesive some scrapbook paper to the fronts and added some dimensional do-dads.  Easy, cheap, and fast! 


This is the banner I have hanging over the entryway table.  It was made from brown paper bags for the base and scrapbook papers.  So easy and my favorite banner!


I hope everyone enjoys their Halloween! 


Tuesday, October 29, 2013

My Little Girl

Just wanted to let everyone know what has been keeping me busy and away from my blog!  Thanks for staying with me and I will be back on a regular schedule shortly!

Tip Tuesday - Making Holidays Special

We LOVE holidays at our house!  I try to do little things to make the holidays special for the kids without spending a lot of money.  It is super easy to do and fun and the kids look forward to them every year! 

One thing I always do is make breakfast special.  Sometimes I color their pancakes with food coloring and always cut them into shapes with cookie cutters.
This weekend I made cinnamon rolls (yes from Pillsbury not scratch) and to make them "Halloween" I sprinkled Halloween themed sprinkles, confetti, and sugar on them.  My little guy thought they were cool.  You could also color the frosting orange with food coloring. 


Another thing I do is at dinner I color their milk with food coloring.  Last night they had orange milk, in a Halloween cup of course! 


I also cut their sandwiches into shapes with holiday themed cookie cutters!  It makes my little guy eat more of them!

Another fun thing for Halloween is making hot dogs into mummy dogs...easy and fun!

http://www.pillsbury.com/recipes/crescent-mummy-dogs/d52a57d7-ab8a-4a1c-8dae-f9f90d03b912

To me it is the little things you do to make the holidays memorable and special that mean the most and it doesn't take a lot of money! 

Friday, September 20, 2013

Crafty Friday - Fall Banner

When I was at the Dollar Store one day I came across packages of fall leaves made of fabric.  I wasn't sure what I could do with them but in my cart they went.  Then, once I started decorating for fall I realized I needed a fall banner in my front hallway.  The Dollar Store leaves worked out perfectly! 


All you need to make this are the leaves from the Dollar Store - or you could cut some out of scrapbook paper- and vinyl for the letters.  I used a copper vinyl and cut the letters to spell "Happy Fall" out on my Silhouette.  Then you put one letter on each leaf.  To hang them I took the stem of the leaf and twisted it over the ribbon hanging on my wall.  I LOVE how it turned out! 


Tuesday, September 17, 2013

Tip Tuesday - Decorating with Pinecones

The calendar says it is Fall but here in Orlando it is still 90 degrees!  I did break out the fall decorations the other day and realized I had a whole bag of pinecones and wasn't sure what to do with them.  Here is what I came up with:


This craft is super easy, quick, and free!  All you need is pinecones, ribbon, and a glue gun.  First I cut a bunch of ribbon and then tied one end around the tips of the pinecones.  Next, take and put a dab of glue on the tip to hold the ribbon securely onto the pinecones.  Then I took a smaller piece of ribbon and tied a bow around where I put the hot glue.  That is all there is to it!   I hung them on the inside of my front door with a command hook.  Perfect for the fall!


Monday, September 16, 2013

Recipe Monday - M & M Cookie Bars

My boys have inherited my sweet tooth and love M & M's.  They asked me to make them some cookies over the weekend and I had a bag of Fall Harvest colored M & M 's so I decided to whip up these M & M cookie bars.  I love these because they are quick and easy, which is needed right now with a newborn!

Ingredients Needed:
Ingredients for your favorite chocolate chip cookie recipe
1 bag of M & M 's


First, prepare your dough according to your favorite chocolate chip cookie recipe up to the point of adding the chips.  I used the Nestle Toll House recipe. 


Once the dough is made stir in the bag of M & M's. 


At this point you could make the dough into cookies but since I have a newborn and little time I decided to spread the dough in a 13 x 9 pan. 


Next, cook in preheated 350 degree oven for about 20 minutes until golden brown and a toothpick inserted into the center comes out clean.  Cool completely, cut, and enjoy the yummy  M & M cookie bars! 


Friday, September 13, 2013

Crafty Friday - Elephant Specimen Art

Today's Crafty Friday is an easy way to add custom artwork to your child's room.   My little girl's room has a theme of pink elephants.  I wanted something different and came up with this specimen art.  I have made similar pieces for my Etsy shop and my own house for the holidays. 


Supplies Needed:
8x10 shadow box (purchased at 40% off at local craft store)
elephant punch
scrapbook paper
white scrapbook paper for background
pop dots/dimensionals/glue dots
paper cutter


First, I used my elephant punch to make a bunch of elephants out of coordinating scrapbook papers.  I ended up using 24 punched elephants for the project.  You could use less if wanted.
This project is great because you could use any punch or cut shapes out on your cutting machine to coordinate with your room.

Next, trim a piece of white scrapbook paper to 8x10 to be the background to attach the elephants too.


Then I laid the background paper in the frame.  I did this so I had an idea of where the edges were so I didn't place my elephants too close to the edge.


Then place the elephants in the desired pattern and adhere with a glue dot or pop dot for a 3d effect.


Finally, add the rest of the frame and hang!  Easy, quick, and you can change it up to coordinate with any themed room or holiday!


Tuesday, September 10, 2013

Tip Tuesday - Subway Art

For the holidays I like to change out as much of my normal décor for holiday décor as possible.  It can get expensive but here is an inexpensive way to change out your wall décor.

Supplies needed:
 Inexpensive frames (I got mine at the dollar store)
Subway art printed from the internet

I went on Pinterest and typed in fall printable subway art.  The search brought up so many options.  I chose a few to print out as 4x6, 5x7, and 8x10 for different walls and rooms in my house.  I then printed them in color on my printer and trimmed them to fit the frames.  Then just hang them on the wall. 

Here is my bathroom wall before:


And here it is after:


Easy, inexpensive, and festive! 


Friday, September 6, 2013

Crafty Friday - Baby Room Door Decor

When decorating my daughter's room I wanted something besides a wreath for her door.  I got my inspiration for this project from pinterest.  (I can't find the original link - sorry)   Here is my take on an initial wall/door décor.


Supplies Needed:
Wooden Letter (I used a 40% off coupon at local craft store)
Paint                                                     Foam Brush for paint
Scrapbook paper                                  Square Punch
Picture Hanger                                     Vinyl/Scrapbook Letters


First I attached a picture hanging hook to the back of the plain letter K.   I plan on hanging it on the door with just a command hook since it is lightweight.  It is important to do this step first so you do not ruin your paint job trying to attach it later.


Then I put a few coats of pink paint of the letter K front and sides. Allow each coat to dry completely before doing another coat.


While the paint was drying I took 2 coordinating scrapbook papers and punched out 2 different sized squares with my square punch.  I used a gray and pink to match her room.  I punched out 8 squares of each color - one for each letter of her name.  If you don't have a punch you could use a cutting machine or do it by hand.  The squares are 1 1/2" and 1 1/4" wide.


Next, attach the squares together with either double stick tape or glue. 


I had originally planned on cutting out the letters of her name with gray vinyl but thought it was a little bland.  So instead I used some glitter (of course) scrapbook letters.  I placed one letter of her name on each of the stacked squares.


Once all the letters were placed on the squares I glued them down the side of the painted letter K.  Her name is long so it was a tight fit.


I decided that the right side of the letter looked a little dull.  So I took some coordinating pink elephant ribbon and plain pink ribbon and attached with double stick tape and glue dots.


And that is it....all done!!   I think it looks perfect on her bedroom door!  More baby nursery décor to come!!